Lesson #10 Weapon Shooting
Input Control
We need to know whether or not our character is shooting. Input devices, such as the mouse, are able to help with this. Let's handle mouse clicks and trigger specific events based on that action.
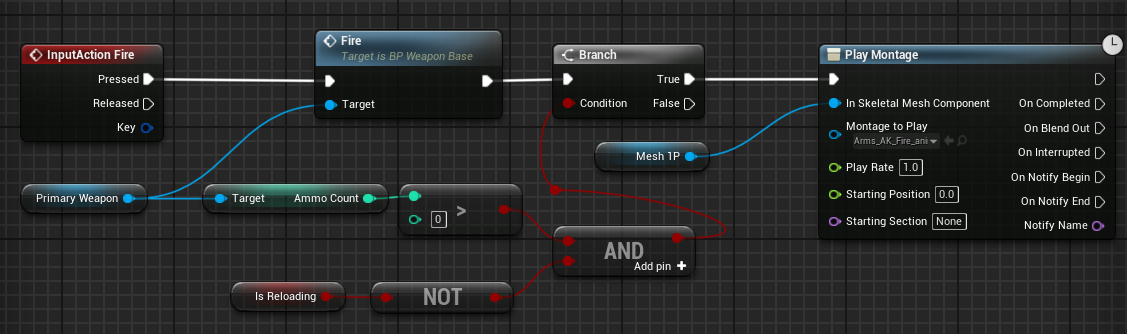
1. Open up FirstPersonCharacter. Create an Input Fire node in the Event Graph. These input events are created and edited in the project settings (Edit > Project settings > Input). We've added a left mouse button/Gamepad right trigger to our Fire event. As a result, whenever those buttons are pressed, this specific event will take place.

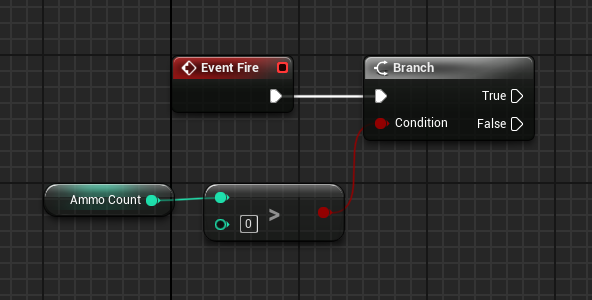
2. Now, whenever we click the left mouse button, we'll trigger our Fire event from our Primary Weapon. Drag your primary weapon variable and press the fire button.

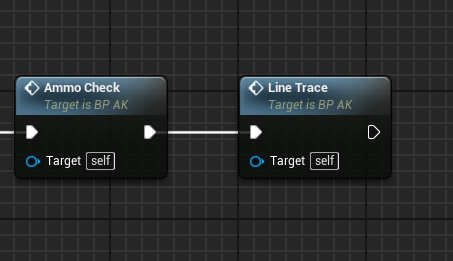
3. Let's double-check that we have enough bullets to fire. Check the AmmoCount from the primary weapon to see if it is greater than 0.
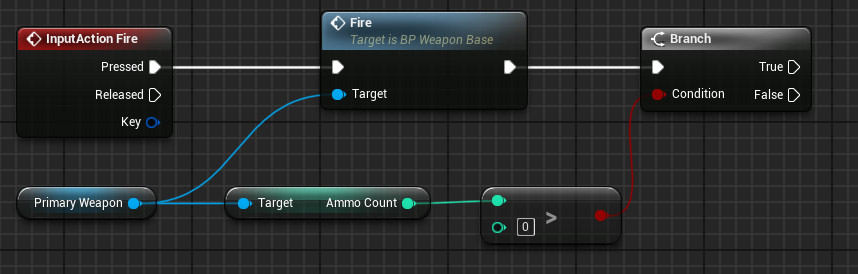
4. Now, if it's greater than zero, we'll play the arms shooting animation. Create montage node from true pin (drag to create). Mesh1P was chosen as the Skeletal Mesh Component (Mesh that will be animated). Let's also make sure that IsReloading isn't true by using the AND node.
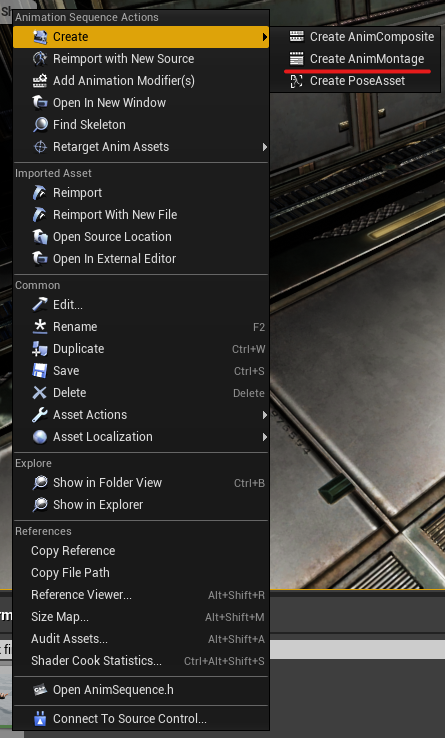
5. Let's make our montage now. Montage is an animation that can be played on top of another animation. For example, we'll play our idle animation repeatedly, and then the fire animation will play on top of that. Locate your Arms_AK_Fire_Animation, right-click, and select "create montage."
6. Now select your montage in play montage node. Compile and save

It won't shoot right now because we haven't set our ammoCount anywhere, so it's basically zero. If you want to test it, simply remove the ammo checking. Let's get our weapon ready to shoot.
Weapon Shooting
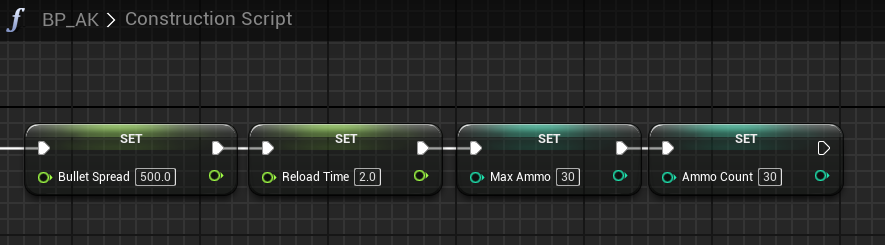
1. We added variables to our weapon base class in the previous lesson. Now, open your AK blueprint and in the construction script, drag and create nodes (set "variable name") and set those variables.
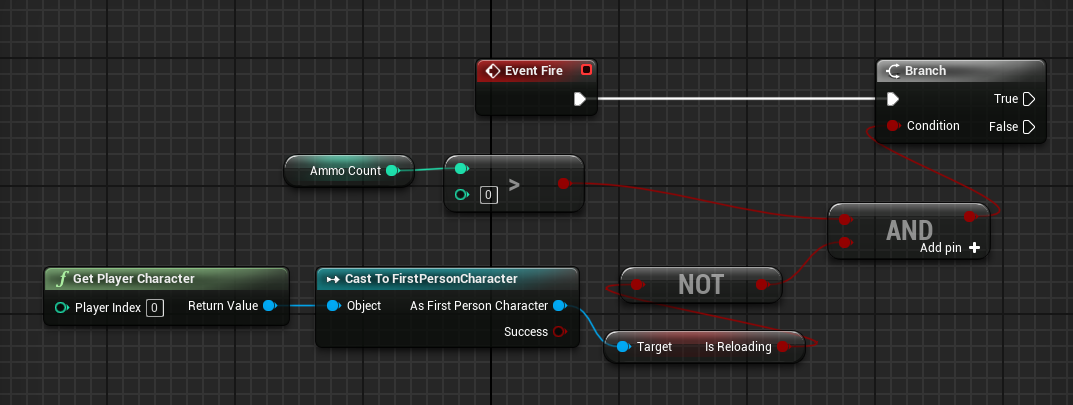
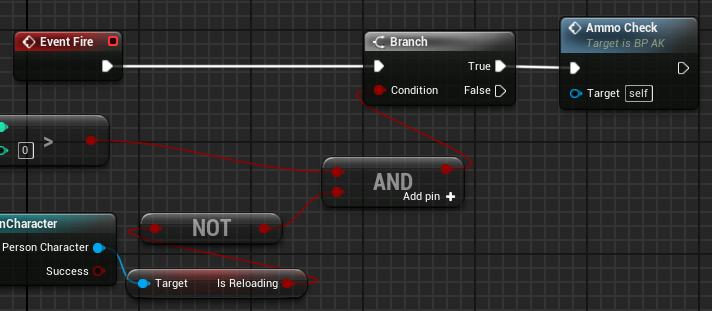
2. Let's add some firepower to our weapon. First, we must check for the Fire event, which we have already set up in our weapon base. Open Event Graph and add a node for the event Fire. Then we'll check (via the Branch node) for ammo, which must be greater than zero.
3. We must also obtain our IsReloading variable from the player in order to determine whether or not we are reloading. Add a node called get player character and cast it to FirstPersonCharacter. Convert a failed cast to a pure cast by right-clicking on it. Get the variable IsReloading now. Then, see if it's false AND the ammo count is greater than zero.
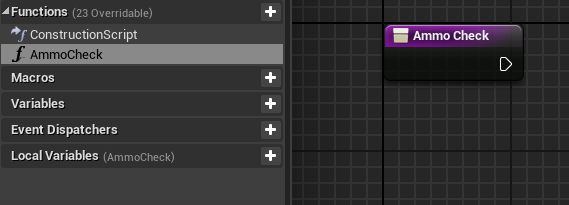
4. Now it's time to fire our gun. To begin, we must create a variable in our FirstPersonCharacter called IsReloading (Boolean). Let's add a new function to our AK blueprint and call it AmmoCheck (in my blueprint panel functions +). In this function, we'll decrement our bullets and play a fire animation.
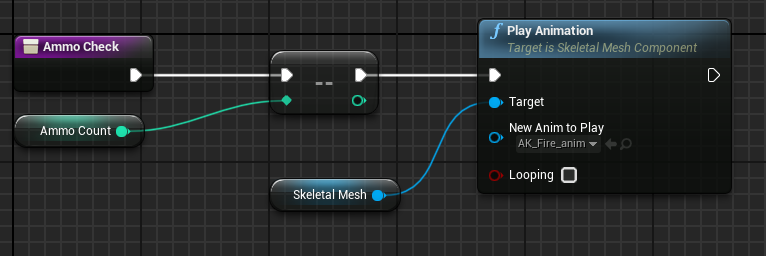
5. Let us decrement our ammoCount every time this function is called. We have a node for decrement (- -). After that, let's play our AK fire animation (we have our skeletal mesh in Components section).
6. Let us now connect it to the fire event in our event graph. Simply drag and drop your function to connect it to true.
Your weapon now has bullets and animations. Let's make some real bullets for our weapon.
Bullets
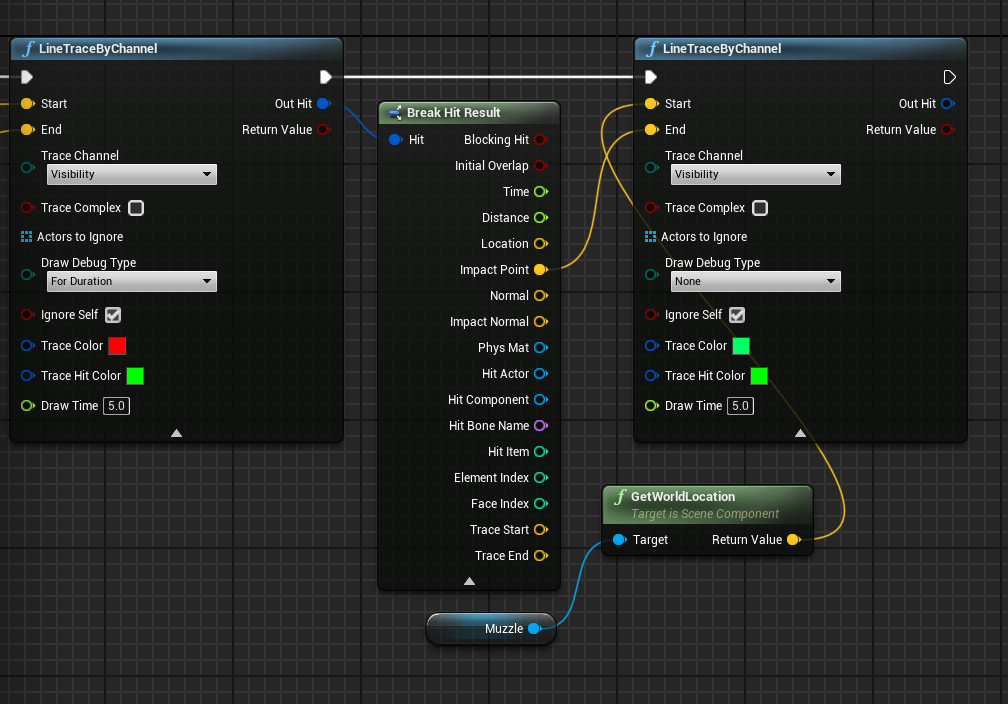
Shooting in games is accomplished through the use of a technique known as line tracing. Line tracing is the process of tracing lines from your weapon's muzzle straight ahead until they hit the surface. However, this line has the potential to be misaligned, so it is preferable to use another line, this time from the camera's center. The point from the muzzle marks the beginning of the line, and the point from the camera marks the end of the line. Let us see how its done.
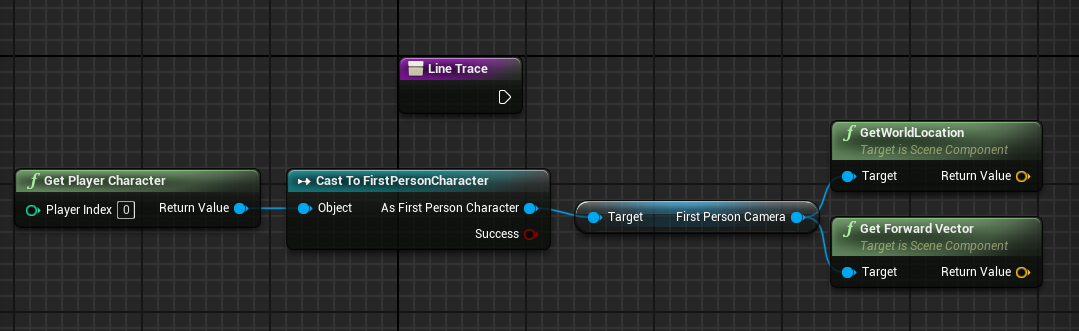
1. In your AK blueprint, create a new function called LineTrace. Lets copy our get character nodes from AmmoCheck function. Now, let's get his camera and determine its position and forward vector.
2. In UE4, we have a line tracing node (LineTraceByChannel), so let's create it and specify the start and end points (start - world location, end - forward vector). However, because we require a long line, we must first multiply our forward vector (for example 2000x line).
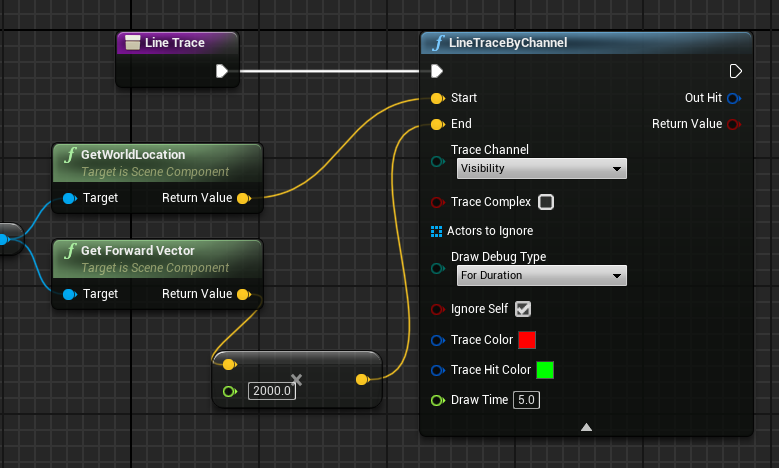
3. To draw a debug, select the Draw Debug option and set duration and draw time to whatever you want (this is how long your line will be visible). And then call this function after ammocheck (In Event Graph). Compile and save.
We now have a line traced from the camera to wherever we look. But we can't shoot bullets from the camera; we have to shoot bullets from the muzzle to the point where we're looking.
4. Let's make our bullets a little more spread-out. We need to increase the spread of our end vector, so we add modified vector. Take your bulletspread variable and multiply it by -1, then generate three randoms within the range (Set min to -1 value and max to bulletspread variable). Combine your camera's world location and forward vector. Then combine bulletspread and summed vector (for bullet spread right click on second vector add node and split struct). We did this so that each of the three vectors would be unique.

5. Let us now break down our Out hit and create a new Line trace. We'll use this to determine the impact point of the previous trace and use it as the end point for our muzzle. Create a break node from out hit, open it up, and connect the impact point to the new linetracebycahnnel node. Drag our muzzle to get its world location for the start location. Change the trace's color to better understand where it's coming from and compile.
Reloading
Let's write some reloading logic for our weapon.
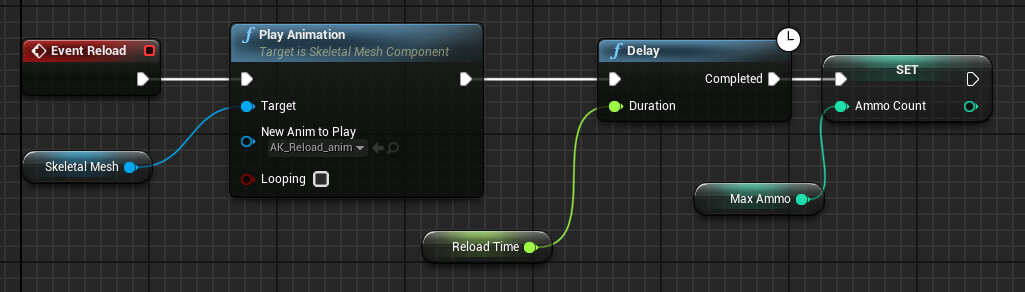
1. Create a reload event node in your AK blueprint Event Graph. Create a node to play the reload animation from there. After that, we'll add a delay to our reload time and set our ammocount to maxammo.
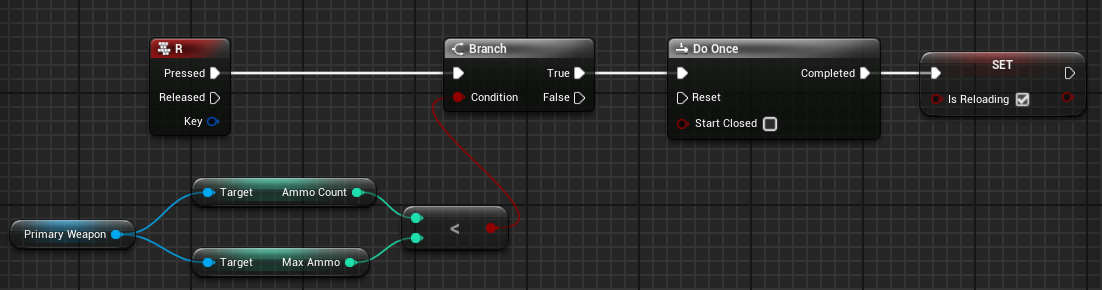
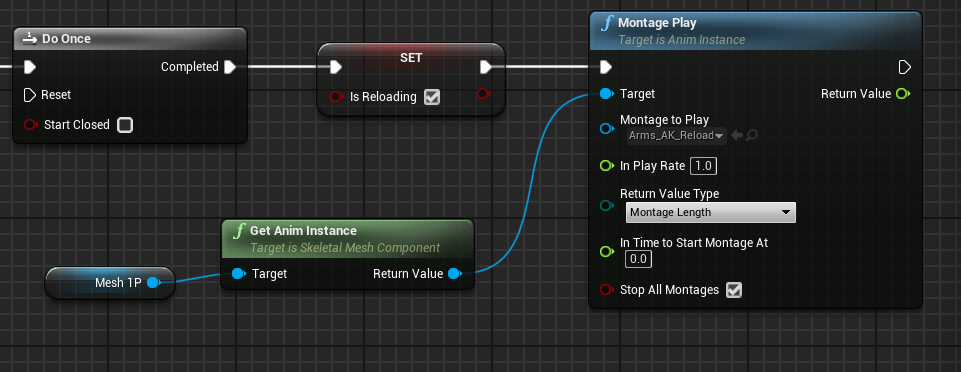
2. Now, launch your first-person character. Make a R key node. Now we need to see if our ammocount is less than our maximum ammocount, because we don't need to reload if we are full. If this condition is met, set is reloading to true only once.
3. Let's do an arm montage now. Create an animation montage for our arms_AK_reload as we did before, then get an instance of our arms animation and play the montage.
4. Let us now call the reload event on our weapon and add another delay, after which we will set our IsReloading back to false.
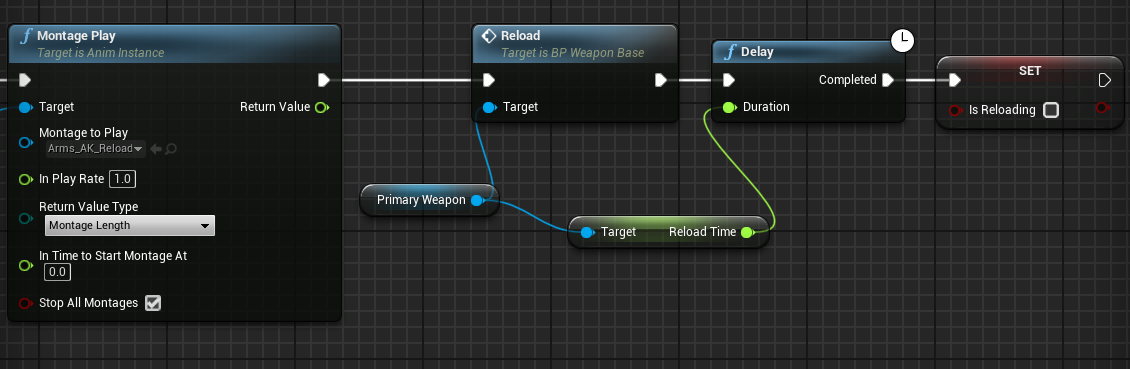
5. Drag the end point into the do once node because we only want the reloading to happen once. Compile and save your work.

Note: You can experiment with the reload time to get the animation to match. If it's too fast, you'll be able to shoot while the animation is still playing (3 seconds is great value for AK reload).
In the next lesson we are going to add effects for our weapon.
© 2025 Edward Leks. All rights reserved.